Banner

Showing posts with label How-To. Show all posts

Monday, March 7, 2011

[HOW-TO] - Jailbreak iPod touch 4G / 3G on iOS 4.3 GM Using PwnageTool (Tethered JB)

  • Can’t wait to Jailbreak your iPod Touch iOS 4.3?
  • Wait no more... if you are willing to Jailbreak in a more slightly difficult than the normal Pwnage Tool, you can use the method below.
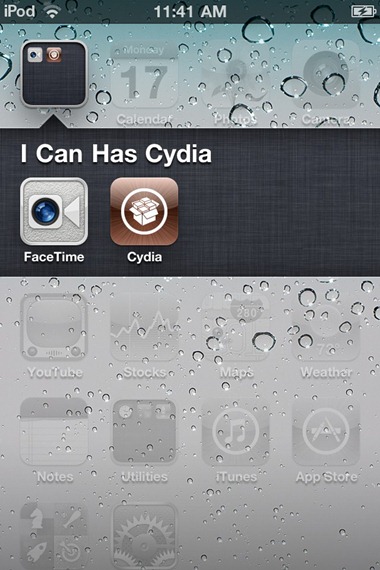
iOS developer and hacker iH8sn0w and jcf_dev have released PwnageTool bundles to jailbreak iOS 4.3 GM on iPhone, iPad and iPod touch. You can use these bundles with PwnageTool 4.2 to create custom jailbroken 4.3 firmware files.
Jailbreak-iPod-touch-4G-on-iOS-4.3-2011-03-7-21-29.jpg
Unfortunately though, this is a tethered jailbreak, which means you will need to restart your iPod touch in a tethered-jailbroken mode on every reboot using tetheredboot utility.
We have already covered extensive tutorials on how-to jailbreak iPhone and iPad on iOS 4.3. The instructions for both iPod touch 4G and 3G are exactly same as the ones for iPad. You can follow the instructions posted here, with some changes as explained below.
  • On Step 3, download iPod4,1_4.3_8F190.bundle file and move it to the location as mentioned in the instructions.
  • On Step 5, select “iPod touch 3G, 4G” option when PwnageTool prompts to select your device.
  • On Step 6, browse for iOS 4.3 GM for iPod touch 4G or 3G.. duh
  • On Step 13, use kernelcache.release.n81 and iBSS.n81ap.RELEASE.dfu instead of kernelcache.release.k48 and iBSS.k48ap.RELEASE.dfu
  • On Step 14, use the following commands in Terminal:
/Users/Edoras/Downloads/tetheredboot/tetheredboot 
/Users/Edoras/Downloads/tetheredboot/iBSS.k48ap.RELEASE.dfu 
/Users/Edoras/Downloads/tetheredboot/kernelcache.release.k48
Download iOS 4.3 GM for iPod touch 4G / 3G
Download iTunes 10.2
Download PwnageTool 4.2 

Download iOS 4.3 PwnageTool Bundle for iPod touch 4G 

Download iOS 4.3 PwnageTool Bundle for iPod touch 3G
Full details: HERE

Sunday, February 13, 2011

[HOW-TO] - Use GreenPois0n RC6 to Jailbreak Apple TV 2 (ATV2)

  • Another kudos to awesome effort of Chronic Dev Team!
  • Finally the Jailbreak for Apple TV 2 has been release by the fantastic Chronic Dev Team! When the team release GreenPois0n RC5, it did not support Apple TV2. 
  • Greenpois0n RC6 now available for both Windows & Mac machines that untethers Apple TV 2G jailbreak on iOS 4.2.1.
To be able to untether iOS 4.2.1 on Apple TV 2G, you have to follow the step by step guide posted here or here and you'll get Apple TV 2G untethered jailbroken on iOS 4.2.1. 

STEP 1: Your device must be on iOS 4.2.1, then download GreenPois0n RC6 for Mac OS X

STEP 2: Launch GreenPois0n RC6 then connect your ATV2 into your Mac via USB and click on Jailbreak as shown below:
 

STEP 3: Follow the instructions shown on the screen to enter DFU mode:
 

STEP 4: Once jailbroken, you'll get Cydia installed on your iOS device and you won't need to use Just tethered boot right now option anymore.


Download links of greenpois0n RC6 below:

Download Greenpois0n RC6 for Mac OS X
Download Greenpois0n RC6 for Windows
Download iOS 4.2.1 for Apple TV 2G

You can follow us on Twitter and Edoras FotoZine Blog.


Monday, February 7, 2011

[HOW-TO: Add NEW Cydia Sources!

[HOW TO] - Add CYDIA Sources / List

UPDATE (Feb. 7, 2011): NEW SOURCES! CLICK --> HERE!

Friday, February 4, 2011

HOW TO: Untethered Jailbreak Using GreenPois0n RC5 for iOS 4.2.1

Greenpois0n 1.0 RC5 ***
Description of the software:
  greenpois0n will Jailbreak your iDevice.
Supported iDevices:
  - iPod Touch 2G (all bootroms)
  - iPod Touch 3G
  - iPod Touch 4G
  - iPad 1G
  - iPhone 3Gs (all bootroms)
  - iPhone 4
  - iPhone 4 Verizon (_not_tested_)
  - AppleTV 2
Requirements (check this !)
  - A supported device (see above)
  - The device should run iOS 4.2.1. Please check on the device in the Settings -> General -> About page.
    If your device is running an older version, please upgrade iOS first using iTunes.
    *** If you want to SIM Unlock, preserve your baseband using TinyUmbrella ¬®***
  - at least MacOSX 10.5
Notes (checks this also !)
  - If your device is jailbroken with iPhone Dev Team's Monte, please restore to fresh 4.2.1. first
  - If Cydia doesn't show up after Loader, you may need to reboot the device
  -This version of greenpois0n doesn't include a patched activation system. You'll need to activate your device using iTunes
  - WE DO NOT SUPPORT PIRACY !
Instructions
  1.     Plug the device to your computer using the USB cable
  2.     Quit iTunes if it shows up
  3.     Start greenpois0n.app
  4.     Follow instructions
  5.     The device will boot a 1st time with verbose text on screen. This operation will install the jailbreak on the device.
  6.     The device will reboot normally
  7.     Start the Loader application (green icon on the SpringBoard), and follow instructions to install Cydia

Wednesday, February 17, 2010

Tuesday, February 16, 2010

[HOW-TO] - How to Jailbreak Your iPhone 3GS Using PwnageTool [Mac]

This tutorial will show you how to jailbreak your iPhone 3GS using PwnageTool for Mac. PwnageTool now supports the latest 3.1.3 firmware.

Source from iClarified --> How to Jailbreak Your iPhone 3GS Using PwnageTool [Mac]

Saturday, February 13, 2010

[HOW-TO] - Fixed iPhone Stuck on Apple Logo

Sometimes when jailbreaking an iPhone or after installing a jailbreak app, your iPhone will getstuck on reboot, or will hang on the Apple logo. This problem happened to me before and it was kind of a nightmare. In order to get your iPhone back on track, you will have to put it in DFU mode (Device Firmware Update mode). This will help you restore your iPhone without loading the OS first.

Putting you iPhone into DFU mode should be used as a last resort if your iPhone is either stuck on the Apple logo or keeps rebooting.

1. Connect your iPhone to iTunes.

2. Hold the Home button and the Power button at the same time for 10 seconds.

3. After exactly 10 seconds, release the Power button but keep holding the Home button for 10 seconds or until iTunes pops up a message saying that it has detected an iPhone in recovery mode. At this point, click OK, then click “Restore” in iTunes.

Note that it often takes several attempts to get your iPhone in DFU mode.

Full article from this site --> Fixed: iPhone Stuck On Apple Logo

Saturday, January 31, 2009

[HOW-TO] - Upgrade Firmware 2.2.1 for your iPhone 3G

Today, the Dev Team have published a method how to upgrade to Firmware 2.2.1.
Below is taken from their website....

This is the low down on our tools for use with the 2.2.1 firmware from Apple, read the whole post in full before attempting anything. Please note that the Windows version of QuickPwn has been updated to version 2.2.5-2

  1. GOLDEN RULE: If you have a 3G iPhone running 2.2 firmware and you want to keep your ability to use yellowns0w (or the option to use it in the future) do NOT use QuickPwn, and do not use the official ipsw or the iTunes update process without using PwnageTool.
  2. Yellowsn0w will NOT work with the baseband version (02.30.03) that is present in the recent 2.2.1 update. If you want to use Yellownsn0w you will need to create and restore using a custom .ipsw that will allow you to update safely to 2.2.1 without applying the 02.30.03 baseband update. You’ll then have a 3G iPhone running 2.2.1 with an older baseband version that is still vulnerable to yellowsn0w, following these steps ensures that yellowsn0w will still operate. 
  3. Please read all parts of this post before downloading and using these tools.
  4. Read items 1, 2 and 3 again and again.
  5. At the bottom of this post are the bittorrent files for the latest versions of PwnageTool and QuickPwn.
  6. These apps are suitable for the recent 2.2.1 release.
  7. The Yellowsn0w version has been updated to 0.9.7. Yellowsn0w is available from Cydia or Installer - this version allows compatibility with pwned 2.2.1 system (not baseband). Again„ remember 0.9.7 yellowsn0w DOES NOT WORK WITH 2.2.1 (02.30.03) directly - you need to be running a ‘pwned’ version of 2.2.1 which didn’t upgrade the baseband during the restore/upgrade.
  8. Users of OS X 10.5.6 will be unable to use DFU mode correctly, please see the note towards the end of this post to easily fix this issue.
Baseband 101

The ‘baseband’ is the generic name given to the internal components of the iPhone that handle the phone calls and Internet access. This ‘baseband’ is a tiny and unique independent computer system that runs inside your iPhone, it is separate to the main system that handles the applications (such as email and google maps) and it talks to the main part of the phone over an internal communications network. Think of it like a cable modem or other peripheral that is attached to your home PC that needs occasional updates. When a software update is released and presented to you within iTunes the baseband is sometimes updated (to fix bugs or add new features). The 2.2.1 update for the iPhone 3G contains such an update, so running the vanilla updater straight away with iTunes will reprogram and update the baseband. This could be bad for certain people, depending on your ultimate aim.

SIM Free/SP Unlocked/Factory Unlocked iPhone 3G

This applies if you bought your iPhone 3G for $$$$$$$. This model of iPhone 3G doesn’t have an Service Provider lock (aka factory unlocked) and you are able to put any SIM card into the phone and get service. Your phone is already unlocked so you do not need to worry about baseband updates, simply upgrade to 2.2.1 using iTunes and then use QuickPwn to Pwn and Jailbreak. This will add Cydia and Installer too.

Locked iPhone 3G - Preserve Baseband

This applies if you have a locked iPhone 3G and you wish to update to 2.2.1 but preserve the iPhone’s current baseband software. Preserving the baseband will ensure that you can still use “yellowsn0w” the iPhone 3G unlock application. To upgrade your phone to 2.2.1 and preserve the state of the baseband you need to create a custom .ipsw with PwnageTool. This custom .ipsw will not contain the baseband update but of course will still give you any new stuff from 2.2.1

There are plenty of tutorials about this process on the web, but PwnageTool contains intuitive graphics and easy to follow prompts that should have you up and running in no time at all. Please note: PwnageTool is only available for Mac OS X.

Locked iPhone 3G

If you are using your iPhone with one carrier and have no interest in the possibility of an iPhone 3G unlock in the near future then just restore or upgrade to 2.2.1 using iTunes and use QuickPwn to Jailbreak and add Cydia and Installer.

iPhone 2G (1st Generation)

Update or Restore your iPhone 2G with iTunes then run QuickPwn to do the magic, ‘nuff said, you don’t need to worry about anything.

iPod Touch 1G (Original iPod Touch)

Update to 2.2.1 with iTunes and run QuickPwn.

iPod Touch 2G (New iPod Touch)

Sorry, no support at this time, but Redsn0w is being actively researched and developed.

Fixing DFU mode on 10.5.6

As noted previously OS X 10.5.6 introduced a bug that affected the use of DFU mode. with some Macs. There have been previously published hacks and techniques to fix this, but here is another method that can be used to temporarily restore DFU functionality in order to use QuickPwn or PwnageTool.

  1. You will need an account with ADC (Apple Developer Connection) this is free and takes a few minutes to sign up, you should read the terms and conditions carefully and you should only sign up if you are thinking of developing applications in the future - http://developer.apple.com/mac/
  2. Download the disk image “IOUSBFamily-315.4-log.dmg” for Mac OS X 10.5.5 Build 9F33” (yes, that is a “5” in 10.5.5 - this is a developer debug package of the USB kernel extension).
  3. Unplug non-vital USB equipment, such as external DVD writers, USB scanners, USB mass storage devices, at the most leave a Keyboard and Mouse connected.
  4. Install IOUSBFamily-315.4.1.pkg from within the disk image
  5. Reboot your system!
  6. Perform necessary DFU activity with QuickPwn or PwnageTool.
  7. Download the disk image “IOUSBFamily-327.4.0-log.dmg” for Mac OS X 10.5.6 Build 9G55”
  8. Intall IOUSBFamily-327.4.0.pkg from within the disk image
  9. Reboot your system!
  10. Reattach your USB peripherals.
Official Bittorrent Releases -

  • PwnageTool 2.2.5 for Mac OSX is here SHA1 Sum - 8fe2f20c00f48b37d8262d6872a12166c6e165ba
  • QuickPwn 2.2.5 for Mac OSX is here SHA1 Sum - 2f1353242ef10dc408e95786643e497fcd04e4ea 
  • QuickPwn 2.2.5-2 for Windows is here SHA1 Sum - 82aae63218316af42e4fa20f8c69d9eb4fe9d4ee
Unofficial Mirrors

The following links are unofficial download mirrors, you download these at your own risk, we accept no responsibility if your computer explodes or if it becomes part of a NASA attacking botnet or even worse if your hands fall off mid-way during the use of these archives. We do not check these links or archives and we accept no responsibility with regard to the validity of the files, or with other content these links provide or with the content that is on the linked site. Always check the published SHA1 sums. We would prefer that you downloaded the official bittorrent release that is linked above, but you are welcome to try these if you really must. Mirror owners should email direct links only to blog@iphone-dev.org , please don’t place mirrors in the comments as they will be deleted.

Mac PwnageTool

http://iphone-dev.fgv6.net/PwnageTool_2.2.5.dmg
http://iphone.schwarzmetall.cn/PwnageTool_2.2.5.dmg
http://rabstalk.bplaced.net/mirrors/PwnageTool_2.2.5.dmg
http://jmcoon.net/PwnageTool_2.2.5.dmg
http://downloads2.ipod.backshot.eu/PwnageTool_2.2.5.dmg
http://www.iphone-storage.de/PwnageTool_2.2.5.dmg
http://miphone.ca/iphone-dev/PwnageTool_2.2.5.dmg

Mac QuickPwn

http://iphone-dev.fgv6.net/QuickPwn_2.2.5.dmg
http://iphone.schwarzmetall.cn/QuickPwn_2.2.5.dmg
http://rabstalk.bplaced.net/mirrors/QuickPwn_2.2.5.dmg
http://jmcoon.net/QuickPwn_2.2.5.dmg
http://www.iphone-storage.de/QuickPwn_2.2.5.dmg
http://downloads2.ipod.backshot.eu/QuickPwn_2.2.5.dmg
http://miphone.ca/iphone-dev/QuickPwn_2.2.5.dmg

Saturday, January 24, 2009

[HOW-TO] - Install .ipa Files

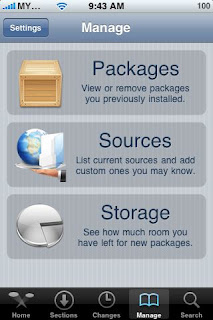
1) STEP 1: Under Cydia, select "Manage"
2) STEP 2: Select "Sources"
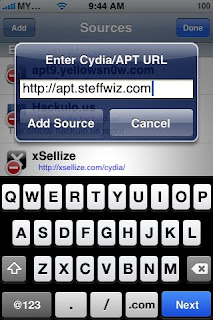
3) STEP 3: Add source "apt.steffwiz.com". 
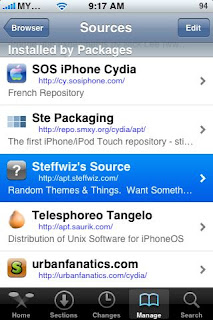
4) STEP 4: Find "Steffwiz's Sources"
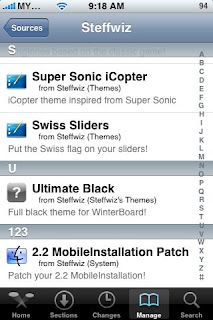
5) STEP 5: Under category "123" Select "2.2 MobileInstallation patch"
6) STEP 6: Once you have installed the MobileInstallation Patch, you can download any .ipa files to your iTunes and sync to the iPhone. Voila!!


Wednesday, January 7, 2009

[HOW-TO] - Solve the Problem of "Call Failed" Issue in Yellowsn0w 0.9.6


Today, I have problem with my iphone which is unlocked with 0.9.4.
I uninstalled the 0.9.4 and install with 0.9.5 --> reboot --> MY CELCOM signal appears!

All of the features was working excellently except when I make a call, it always showed "CALL FAILED".
After some debugging, I realized that I have need to change "SHOW MY CALLER ID" to "ON".
Then, it works perfectly! :hyper:

I believed this 0.9.6 is much easier to unlock as compared to 0.9.5 as described my Dev Team and has got many good comments from around the world.

Sunday, January 4, 2009

[HOW-TO] - Disable "Call Forwarding Active - Dismiss" Message on your iPhone


The “call forwarding” popups in the iPhone 3G can be disabled by editing the carrier.plist file. This file can be find in this forlder:/System/Library/Carrier Bundles/Unknown.bundle/
Search for :
[key]ShowCallForwarded[/key]
[YES/]
[key]ShowCallForwarding[/key]
[YES/]

Now change the “YES” values into “NO”
[key]ShowCallForwarded[/key]
[NO/]
[key]ShowCallForwarding[/key]
[NO/]

Tuesday, December 9, 2008

[HOW-To] - Create Bootable Leopard Disk using Firewire Drive


Get yourself a nice big external firewire hard drive. You're going to want one to use with Leopard anyway, so you can use Time Machine. (Time Machine will probably not back up to a partition on an internal drive; it's looking for an external drive.)

Use Disk Utility (you can do this with Tiger) to repartition the drive. As you do the repartitioning, take great care to specify the correct partition scheme! If you're using a PPC machine, you want the Apple Partition Map (the default). If you're using an Intel machine (because you have no PPC machines), you want the GUID partition scheme; it is easy to neglect this step, and if you do, and you accidentally use APM, you won't be able to make a Leopard bootable disk. We suggest three partitions:

  • A 10 GB partition to hold the clone of the Leopard DVD.
  • A 30 GB partition to hold the Leopard system.
  • All the rest to hold Time Machine backups.
  • As described in the earlier tutorial, insert your Leopard installer DVD into the computer and make an image file from it. Now "restore" (clone) the image file to the first partition on the external firewire drive.

The first partition on the external firewire drive is now bootable: it is a clone of the installer DVD. So boot from it! The effect is just as if you had booted from the installer DVD: the installer will offer to install Leopard. Do an erase-and-install onto the second partition of the external firewire drive.

At the end of the installation process, the installer will automatically reboot the computer from the Leopard system it just installed on the second partition of the external drive. You will have to go through the usual kerfuffle about creating an initial admin user, declining the opportunity to subscribe to .Mac, etc. When you're all done, you'll be running Leopard from an external drive.

You should probably immediately use the Spotlight and Time Machine system preferences to set things up correctly. Your goal here is to prevent the computer from bogging down (and the fans from spinning up) by immediately indexing and backing up a bunch of unnecessary stuff.

You now have an external firewire drive that can boot your computer into Leopard. Remember to "put away" this drive properly before turning it off or unhooking it from the computer!

Saturday, October 18, 2008

[HOW TO] - Get Your Malaysia Caller ID Working


On Oct. 15, I decided to plunge into using the "turbosim" solution which only costs me RM 185. With the help of a friend, we installed the hardware unlock solution and it works the minute we boot up the iPhone 3G.

However, since I have a Jaibroken 2.1 iPhone 
3G, I am faced with another challenge - the Caller ID issue.

Found a site that helped me a lot --> iSPAZIO

After patching with the Caller ID Fix, the problem still persist with an odd twist. The SMS caller ID is OK but however when I received call the ID is not displayed. The IDs are only displayed when I looked at the list of Missed Calls.

I tweaked around with the .plist files (I'm from Malaysia) and still unable to resolve it.

However, got the following reply from Frank8:
verify this file :
/private/var/mobile/Library/Preferences/com.apple.AppSupport.plist
set the two items to my

CPActiveCountryCode my
CPNetworkCountryCode my

restart
tell me what you have found instead
and if it works also without 001 my


Here's some of the pics... and I finally managed to solve it!!! Thanks to Frank8 from iSAZIO.

When I checked the file, I found the two items are set as:

CPActiveCountryCode my
CPNetworkCountryCode
sg


Thus, when I changed to:

CPActiveCountryCode my
CPNetworkCountryCode
my


and restart. It WORKS!!

Also suggest to read this ---> Contact Numbers Issues


Sunday, September 14, 2008

[HOW TO] - Jailbreak iPod Touch Firmware to 2.1

  • Download the latest Pwnage 2.1
  • Install iTunes 8
  • Download .ipsw for Firmware 2.1
  • Launch pwnage and install as normal

Saturday, September 13, 2008

[HOW TO] - Solve the Applications from Apple Store From Crashing

Initially (before Jailbreaking), all the applications which I downloaded from the Apple Store will crash (suddenly quits) after launching.
Weird but true... after I have Jailbroken the iPod Touch, it no longer crashes!
The same thing with my Jailbroken iPhone 3G.

Why don't you guys try that! ;-)

[HOW TO] - Add CYDIA Sources / List

Here are a list of sources for Cydia (some are by default):
- BigBoss & Planet-iPhone: http://apt.bigboss.us.com/repofiles/cydia/
- ModMyiFone: http://modmyifone.com/repo/
- Ste Packaging: http://repo.smxy.org/cydia/apt/
- iSpazio: http://ispaziorepo.com/cydia/apt
- Telesphoreo Tangelo: http://apt.saurik.com/
- ZodTTD: http://www.zodttd.com/repo/cydia/

Other notables:
- intelliborn: http://intelliborn.com/cydia
- FreeCoder: http://iphone.freecoder.org/apt/
- Hack&Dev.org: http://iphone.hackndev.org/apt/
- SaladSoft: http://nickplee.com/cydiasource/
- Urbanfanatics.com: http://urbanfanatics.com/cydia/
- iPhoneCake: http://cake.mapleidea.com/cydia/
- WeiPhone: http://app.weiphone.com/cydia/
- iFoneTec: http://app.ifonetec.com/cydia/
- iSpazio: http://ispaziorepo.com/cydia/apt
- Andy Dam: http://repo.gafoogle.com/
- Steffwiz: http://steffwiz.webs.com/iPhone/Repo

To add sources: Launch Cydia—>Manage—>Sources—>Edit—>Add—>enter the URL—>click Add Source
Here are the sources for Installer 4 so far:
- RiP Dev - http://i.ripdev.com/
- BigBoss’s Apps and Things. - http://apptapp.thebigboss.org/repofiles/installer4/
- iSpazio Official - http://repo.neolinus.org/ispazio/
- Ste Packaging - http://repo.smxy.org/installer4/
- ClubiFone - http://www.clubifone.com/repo/
- iPhone-notes.de - http://sendowski.de/iphone/
- a27 Dev Team: http://a27dev.com/installer/repo/
- Hackmyiphone: http://hackmyiphone.net/installer/
- Wildcat: http://iphone.handheld.com.vn/installer
- iClarified: http://installer.iClarified.com
- Modmyifone: http://i.modmyifone.com/

To add sources: Launch Installer 4—>Sources—>Edit—>click the “+”—>type in source URL—>click Done

UPDATE (Feb. 7, 2011): NEW SOURCES! CLICK --> HERE!

UPDATES - OTHER REVIEWS


ShareThis

Related Posts Plugin for WordPress, Blogger...